 | iConquer Develop map and player plug-ins. | |||||||||||||||||||||||||
|
| About iConquer
The iConquer Plug-in Kit lets you develop your onw map and player plug-ins. Use your artistic talents to create stunning photo-realistic maps. Or use your artificial intelligence hacking ability to make the next great player algorithm. The Plug-in Kit adds new project types to Xcode, so you're one click away from starting with a working plug-in.
 Requirements
You'll need to have the Xcode Developer Tools installed. They're included on the Mac OS X install DVD, and are available for download from the Apple Developer Connection.
To create map plug-ins, you'll need a graphics program that can create TIFF or PNG images with transparency, such as Adobe Photoshop. To create player plug-ins, you'll need a knowledge of developing in Objective-C and some background in artificial intelligence algorithms. Getting Started
Download the iConquer Plug-in Kit by clicking the disk image at right, and install the iConquer Plug-in Kit package. Two Xcode project templates will be installed in /Developer/Library/Xcode/Project Templates/iConquer.
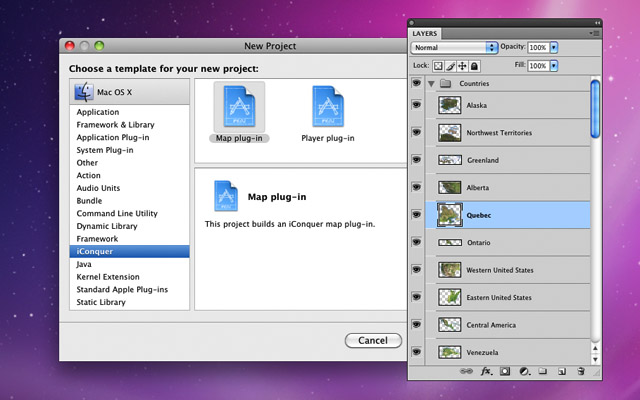
After installing the package, create a new project in Xcode. In the assistant, scroll down to the iConquer project type, and choose "Map plug-in" or "Player plug-in." Then you can choose a name for your plug-in. Build your new project, and Xcode will create a complete, working plug-in in the project's build folder. Customizing your plug-in
You'll want to customize some information about your project. Look at the Info.plist file, review the values that Xcode has inserted for you, and make any necessary changes.
You should also paste the CFBundleName and ICComments values into the English variant of the InfoPlist.strings file. Values in the InfoPlist.strings file override the non-localized values. If you would like to translate your plug-in, click on InfoPlist.strings in the list of files. Choose Project ▶ Get Info, click "Add Localization," and choose a language. Then edit the other localized variants. Writing your plug-in
This is the part where you get creative! Click a plug-in type below for specific instructions.
Installing your plug-in
Copy your plug-in from your project's build folder to one of the following locations.
~/Library/Application Support/iConquer/ Be sure not to change the extension of your plug-in, which should be .player or .map. To avoid having to repeatedly copy your plug-in when you make changes, you can create a symbolic link, which is similar to an alias. In the Terminal, type the following, substituting the correct path and name for your plug-in:
cd /Library/Application\ Support/iConquer/ Restart iConquer to discover new plug-ins. Maps will appear in the Map menu, and players will appear in the player popup menus in the New Game dialog. Maps can be reloaded by selecting them again from the Map menu, but you must restart iConquer to reload players. Submitting your plug-in
Designed, built and tested your plug-in? Let us know so that we can add it to the list of plug-ins that iConquer can discover automatically.
When you build your project, an archive called MyPlugin.zip will be created in the build directory. Upload this file to your web server. The URL for the plug-in archive should look something like: http://www.mydomain.com/jstalin/MyPlugin.zip If your plug-in is a map, upload the thumbnail image for your plug-in to your web server, at a URL such as: http://www.mydomain.com/jstalin/MyPlugin.png Then email both URLs to us at info@kavasoft.com, and we will add your plug-in to the list that will be displayed when users check for new plug-ins. Linking to your plug-in
After your plug-in has been released, you can link to it with a URL such as:
iconquer://getPlugin?identifier=com.mydomain.mymap.medium Clicking on the link will automatically launch iConquer and install the plug-in with the specified CFBundleIdentifier. Here are some examples. Updating your plug-in
If you update your plug-in, simply send us an email with the new version number. We'll update the version of your plug-in in the list. Users with the old version will see that the plug-in has been updated when they check for new plug-ins.
| |||||||||||||||||||||||||